Adding user `mastodon' ...
Adding new group `mastodon' (1002) ...
Adding new user `mastodon' (1002) with group `mastodon' ...
Creating home directory `/home/mastodon' ...
Copying files from `/etc/skel' ...
Changing the user information for mastodon
# 以下の入力はリターン押下
Enter the new value, or press ENTER for the default
        Full Name []:
        Room Number []:
        Work Phone []:
        Home Phone []:
        Other []:
Is the information correct? [Y/n]
sudo su - mastodon
git clone https://github.com/tootsuite/mastodon.git live && cd live
git checkout $(git tag -l | grep -v 'rc[0-9]*$' | sort -V | tail -n 1)
bundle config deployment 'true'
bundle config without 'development test'
bundle install -j$(getconf _NPROCESSORS_ONLN)
yarn install --pure-lockfile
# mastodonセットアップの実行
RAILS_ENV=production bundle exec rake mastodon:setup
# exitでmastodonユーザーを抜ける
exit
Your instance is identified by its domain name. Changing it afterward will break things.
# サイトで使用する独自ドメイン名を入力("your-domain"箇所を書き換えます)
Domain name: your-domain

Single user mode disables registrations and redirects the landing page to your public profile.
# お一人様サーバーとして作る場合は"y"を入力
Do you want to enable single user mode? yes
# Dockerを使用しないので"n"を入力
Are you using Docker to run Mastodon? no

PostgreSQL host: /var/run/postgresql
PostgreSQL port: 5432
Name of PostgreSQL database: mastodon_production
Name of PostgreSQL user: mastodon
Password of PostgreSQL user:
Database configuration works! ?

Redis host: localhost
Redis port: 6379
Redis password:
Redis configuration works! ?

Do you want to store uploaded files on the cloud? No

Do you want to send e-mails from localhost? No
# メール配信サービス(SendGrid)の場合は以下を入力
SMTP server: smtp.sendgrid.net
SMTP port: 587
# メール配信サービス(SendGrid)の場合は以下を入力
SMTP username: apikey
# メール配信サービス(SendGrid)から取得のAPI KEYを入力(入力値は非表示)
SMTP password:
SMTP authentication: plain
SMTP OpenSSL verify mode: none
Enable STARTTLS: auto
E-mail address to send e-mails "from": Mastodon <notifications@mastodon-sw.xyz>
Send a test e-mail with this configuration right now? Yes
# テストメールの宛先を入力(以下は記入例)
Send test e-mail to: abc@123456.com

This configuration will be written to .env.production
Save configuration? Yes

Now that configuration is saved, the database schema must be loaded.
If the database already exists, this will erase its contents.
Prepare the database now? Yes
Running `RAILS_ENV=production rails db:setup` ...

Created database 'mastodon_production'
Done!

The final step is compiling CSS/JS assets.
This may take a while and consume a lot of RAM.
Compile the assets now? Yes

Running `RAILS_ENV=production rails assets:precompile` ...

yarn install v1.22.19
[1/6] Validating package.json...
[2/6] Resolving packages...
[3/6] Fetching packages...
[4/6] Linking dependencies...
warning Workspaces can only be enabled in private projects.
[5/6] Building fresh packages...
[6/6] Cleaning modules...
Done in 60.29s.
I, [2023-xx-xxT08:11:28.021239 #45856]  INFO -- : Writing /home/mastodon/live/public/assets/doorkeeper/admin/application-a644908e7bab54fb749be0f59fb64a7480bbf9c4c2b79d4a65791cb7ab4d8730.css
I, [2023-xx-xxT08:11:28.021740 #45856]  INFO -- : Writing /home/mastodon/live/public/assets/doorkeeper/admin/application-a644908e7bab54fb749be0f59fb64a7480bbf9c4c2b79d4a65791cb7ab4d8730.css.gz
I, [2023-xx-xxT08:11:28.085015 #45856]  INFO -- : Writing /home/mastodon/live/public/assets/doorkeeper/application-c93dac2ad9d65e3393e0e2c958481e86ef7a5e5b0f6ce406842a7b99b25a4850.css
I, [2023-xx-xxT08:11:28.085303 #45856]  INFO -- : Writing /home/mastodon/live/public/assets/doorkeeper/application-c93dac2ad9d65e3393e0e2c958481e86ef7a5e5b0f6ce406842a7b99b25a4850.css.gz
I, [2023-xx-xxT08:11:28.093284 #45856]  INFO -- : Writing /home/mastodon/live/public/assets/pghero/favicon-db10337a56c45eb43c22ff5019546b520fa22c7281d4d385f235cbca67ed26bb.png
I, [2023-xx-xxT08:11:29.490363 #45856]  INFO -- : Writing /home/mastodon/live/public/assets/pghero/application-a60bf0a452ed064fef3594cf52a4c998712da7c76150f890f4eaa644f59671e4.js
I, [2023-xx-xxT08:11:29.495624 #45856]  INFO -- : Writing /home/mastodon/live/public/assets/pghero/application-a60bf0a452ed064fef3594cf52a4c998712da7c76150f890f4eaa644f59671e4.js.gz
I, [2023-xx-xxT08:11:29.514550 #45856]  INFO -- : Writing /home/mastodon/live/public/assets/pghero/application-c31338f656687c1d733bb0f48d40acd076e24060f3dcff83b34870e4ccc2789d.css
I, [2023-xx-xxT08:11:29.515040 #45856]  INFO -- : Writing /home/mastodon/live/public/assets/pghero/application-c31338f656687c1d733bb0f48d40acd076e24060f3dcff83b34870e4ccc2789d.css.gz
Compiling...
Compiled all packs in /home/mastodon/live/public/packs
Browserslist: caniuse-lite is outdated. Please run:
  npx update-browserslist-db@latest
  Why you should do it regularly: https://github.com/browserslist/update-db#readme

Done!

All done! You can now power on the Mastodon server ?
# mastodon管理者アカウントの作成
Do you want to create an admin user straight away? Yes
Username: admin
# アカウントに必要なメールアドレスを入力(以下は記入例)
E-mail: abc@123456.com
# ログイン時に必要になるパスワード(要メモ)
You can login with the password: 246664d88798d75675a73d7586855173
You can change your password once you login.
- - - - - - - - - - - - - - - - - - - - - - - - - - - - - - - - - - - - - - - -
# "A"を入力
(A)gree/(C)ancel: A
- - - - - - - - - - - - - - - - - - - - - - - - - - - - - - - - - - - - - - - -
Would you be willing to share your email address with the Electronic Frontier
Foundation, a founding partner of the Let's Encrypt project and the non-profit
organization that develops Certbot? We'd like to send you email about our work
encrypting the web, EFF news, campaigns, and ways to support digital freedom.
- - - - - - - - - - - - - - - - - - - - - - - - - - - - - - - - - - - - - - - -
# "Y"を入力
(Y)es/(N)o: Y
Obtaining a new certificate
Performing the following challenges:
http-01 challenge for mastodon-xx.xyz
Waiting for verification...
Challenge failed for domain mastodon-xx.xyz
http-01 challenge for mastodon-xx.xyz
Cleaning up challenges
Some challenges have failed.
IMPORTANT NOTES:
- The following errors were reported by the server:
Domain: mastodon-xx.xyz
Type: connection
Detail: xxx.230.xxx.146: Fetching
http://mastodon-xx.xyz/.well-known/acme-challenge/4ligDigELRgpJkg5lVgEs_621i39dYTIoOu7jpBGw70:
Error getting validation data
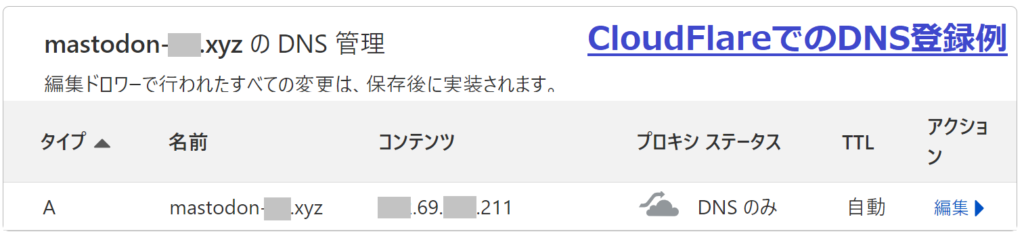
To fix these errors, please make sure that your domain name was
entered correctly and the DNS A/AAAA record(s) for that domain
contain(s) the right IP address. Additionally, please check that
your computer has a publicly routable IP address and that no
firewalls are preventing the server from communicating with the
client. If you're using the webroot plugin, you should also verify
that you are serving files from the webroot path you provided.
- Your account credentials have been saved in your Certbot
configuration directory at /etc/letsencrypt. You should make a
secure backup of this folder now. This configuration directory will
also contain certificates and private keys obtained by Certbot so
making regular backups of this folder is ideal.
- We were unable to subscribe you the EFF mailing list because your
e-mail address appears to be invalid. You can try again later by
visiting https://act.eff.org.
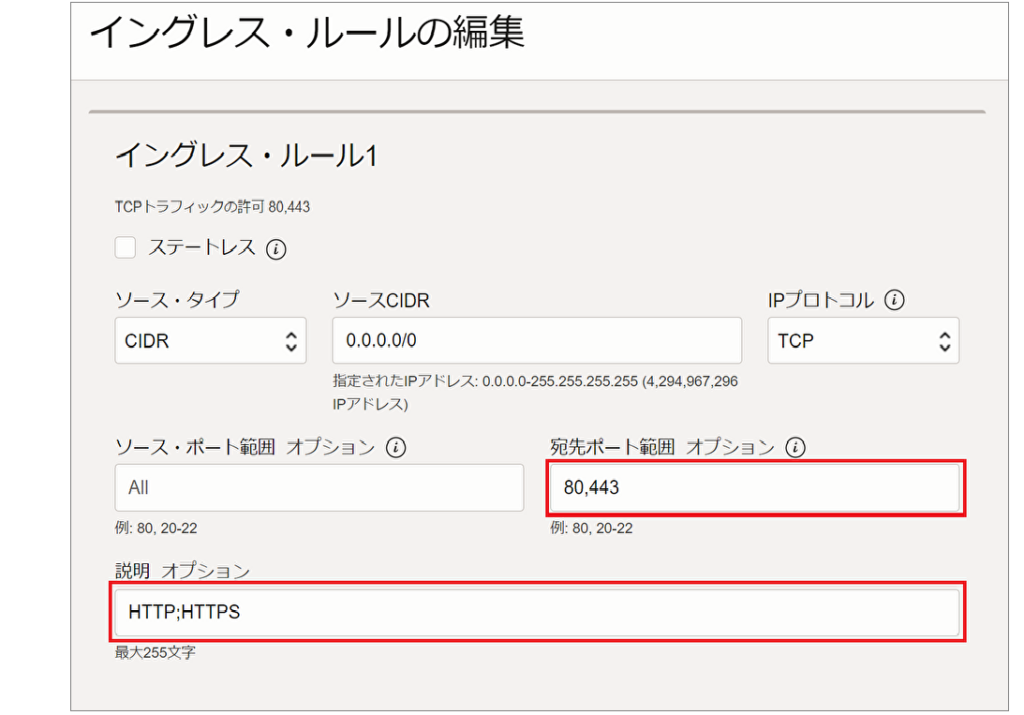
上記のエラーとなる場合は、一旦サーバーを再起動後にやり直してみて下さい。
sudo reboot now
Saving debug log to /var/log/letsencrypt/letsencrypt.log
Plugins selected: Authenticator standalone, Installer None
Obtaining a new certificate
Performing the following challenges:
http-01 challenge for mastodon-xx.xyz
Waiting for verification...
Cleaning up challenges

IMPORTANT NOTES:
 - Congratulations! Your certificate and chain have been saved at:
   /etc/letsencrypt/live/mastodon-xx.xyz/fullchain.pem
   Your key file has been saved at:
   /etc/letsencrypt/live/mastodon-xx.xyz/privkey.pem
   Your cert will expire on 2023-xx-xx. To obtain a new or tweaked
   version of this certificate in the future, simply run certbot
   again. To non-interactively renew *all* of your certificates, run
   "certbot renew"
 - If you like Certbot, please consider supporting our work by:

   Donating to ISRG / Let's Encrypt:   https://letsencrypt.org/donate
   Donating to EFF:                    https://eff.org/donate-le


 letsencrypt.org You must
agree in order to register with the ACME server at
letsencrypt.org You must
agree in order to register with the ACME server at

 acme-v02.api.letsencrypt.org
- - - - - - - - - - - - - - - - - - - - - - - - - - - - - - - - - - - - - - - -
# "A"を入力
(A)gree/(C)ancel: A
- - - - - - - - - - - - - - - - - - - - - - - - - - - - - - - - - - - - - - - -
Would you be willing to share your email address with the Electronic Frontier
Foundation, a founding partner of the Let's Encrypt project and the non-profit
organization that develops Certbot? We'd like to send you email about our work
encrypting the web, EFF news, campaigns, and ways to support digital freedom.
- - - - - - - - - - - - - - - - - - - - - - - - - - - - - - - - - - - - - - - -
# "Y"を入力
(Y)es/(N)o: Y
Obtaining a new certificate
Performing the following challenges:
http-01 challenge for mastodon-xx.xyz
Waiting for verification...
Challenge failed for domain mastodon-xx.xyz
http-01 challenge for mastodon-xx.xyz
Cleaning up challenges
Some challenges have failed.
IMPORTANT NOTES:
- The following errors were reported by the server:
Domain: mastodon-xx.xyz
Type: connection
Detail: xxx.230.xxx.146: Fetching
http://mastodon-xx.xyz/.well-known/acme-challenge/4ligDigELRgpJkg5lVgEs_621i39dYTIoOu7jpBGw70:
Error getting validation data
To fix these errors, please make sure that your domain name was
entered correctly and the DNS A/AAAA record(s) for that domain
contain(s) the right IP address. Additionally, please check that
your computer has a publicly routable IP address and that no
firewalls are preventing the server from communicating with the
client. If you're using the webroot plugin, you should also verify
that you are serving files from the webroot path you provided.
- Your account credentials have been saved in your Certbot
configuration directory at /etc/letsencrypt. You should make a
secure backup of this folder now. This configuration directory will
also contain certificates and private keys obtained by Certbot so
making regular backups of this folder is ideal.
- We were unable to subscribe you the EFF mailing list because your
e-mail address appears to be invalid. You can try again later by
visiting https://act.eff.org.
acme-v02.api.letsencrypt.org
- - - - - - - - - - - - - - - - - - - - - - - - - - - - - - - - - - - - - - - -
# "A"を入力
(A)gree/(C)ancel: A
- - - - - - - - - - - - - - - - - - - - - - - - - - - - - - - - - - - - - - - -
Would you be willing to share your email address with the Electronic Frontier
Foundation, a founding partner of the Let's Encrypt project and the non-profit
organization that develops Certbot? We'd like to send you email about our work
encrypting the web, EFF news, campaigns, and ways to support digital freedom.
- - - - - - - - - - - - - - - - - - - - - - - - - - - - - - - - - - - - - - - -
# "Y"を入力
(Y)es/(N)o: Y
Obtaining a new certificate
Performing the following challenges:
http-01 challenge for mastodon-xx.xyz
Waiting for verification...
Challenge failed for domain mastodon-xx.xyz
http-01 challenge for mastodon-xx.xyz
Cleaning up challenges
Some challenges have failed.
IMPORTANT NOTES:
- The following errors were reported by the server:
Domain: mastodon-xx.xyz
Type: connection
Detail: xxx.230.xxx.146: Fetching
http://mastodon-xx.xyz/.well-known/acme-challenge/4ligDigELRgpJkg5lVgEs_621i39dYTIoOu7jpBGw70:
Error getting validation data
To fix these errors, please make sure that your domain name was
entered correctly and the DNS A/AAAA record(s) for that domain
contain(s) the right IP address. Additionally, please check that
your computer has a publicly routable IP address and that no
firewalls are preventing the server from communicating with the
client. If you're using the webroot plugin, you should also verify
that you are serving files from the webroot path you provided.
- Your account credentials have been saved in your Certbot
configuration directory at /etc/letsencrypt. You should make a
secure backup of this folder now. This configuration directory will
also contain certificates and private keys obtained by Certbot so
making regular backups of this folder is ideal.
- We were unable to subscribe you the EFF mailing list because your
e-mail address appears to be invalid. You can try again later by
visiting https://act.eff.org.